GPU Skinning 支持
目前小游戏平台已经能够支持多线程和 SIMD ,但受限于 CPU 性能(只有原生 App 的三分之一),以及额外的内存占用,使得 CPU Skinning 仍然可能存在较大开销。因此 GPU Skinning 仍然是一个重要选项。
原来的 GPU Skinning 都是基于 Compute Shader 实现的,但 WebGL 1 和 2 都不支持 Compute Shader。 用户为了使用 GPU Skinning,需要自行修改 Vertex Shader 或者使用一些第三方插件,增大了适配平台的成本。 针对于此,团结引擎小游戏平台实现了基于 Transform Feedback 和 Vertex Shader 的 GPU Skinning 方案
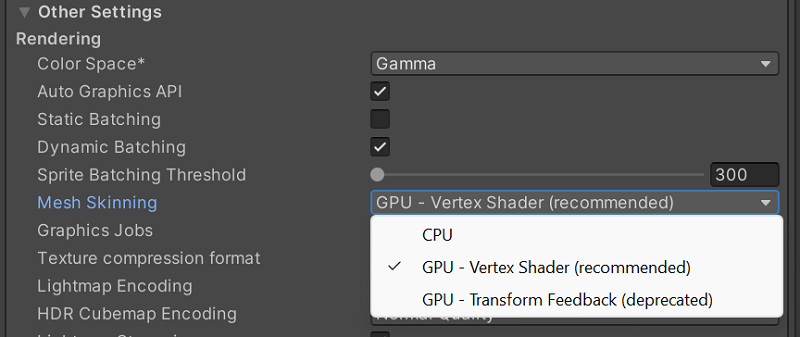
设置选项位于 Project Settings -> Player -> Other Settings ,下拉 Mesh Skinning 选择即可,默认使用 CPU Skinning 。
CPU Skinning
顶点蒙皮运算在 CPU 上执行。每帧动画开始时,先按 FK/IK 计算出所有骨骼的平移和旋转变换矩阵。 然后读取模型在内存中的顶点数据,依据每个顶点的位置和绑定的骨骼权重计算出变换后的顶点位置。 变换后的顶点数据需要每帧重新上传到 GPU,同时供 Shader 的多个 pass(阴影,光照)使用。 CPU Skinning 是 WebGL 平台默认使用的动画方案。
Compute Shader Skinning
顶点蒙皮运算在 GPU 上的计算着色器执行。原始顶点数据、骨骼权重等通过 rawbuffer 或者 structurebuffer 的方式上传到 GPU,不需要每帧重复上传。 骨骼变换矩阵计算在 CPU 上计算时需要每帧更新到 GPU。计算着色器完成顶点蒙皮运算后,将变换后的顶点数据写入到 GPU buffer 中。 该 buffer 作为渲染阶段的顶点输入,可以同时给 shadow/light 等多个 renderpass 使用。WebGL 1 和 2 都不支持 Compute Shader, 因此 Compute Shader Skinning 无法在 WebGL 和小游戏平台使用。
Transform Feedback
新增一个 TF Pass,在 vertex shader 中根据骨骼变换矩阵计算新的顶点位置( local space ),并把经过 vertex shader 处理后的位置输出到绑定 GL_TRANSFORM_FEEDBACK_BUFFER 的缓冲,作为后续绘制的输入数据。整个流程和 compute shader skinning 类似,只是用 vertex shader 代替 compute shader 计算顶点位置。
使用 Transform Feedback 功能需要打开 WebGL 2.0。 目前 Transform Feedback 最多支持单个动画64根骨骼,超出数量后则默认切换为 CPU Skinning。 需要注意,在某些场景下(角色数量多,每个角色顶点数少),Transform Feedback 可能出现负优化的情况。
Vertex Shader Skinning
相比于 Transform Feedback,该方案不需要增加新的 TF pass。 计算顶点位置的代码(同 transform feedback skinning )位于正常绘制的 vertex shader 中,处理后的数据直接用于后续 MVP 坐标转换。 但对于多 Pass 的渲染,比如 ShadowCaster + Normal Pass,每个 Pass 都需要重新计算顶点位置。 部分引擎内置的 shader 已支持 Vertex Shader Skinning(详见下文)。
使用方法
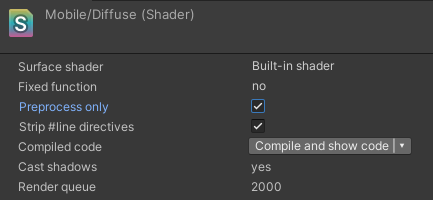
在 Edit -> Project Settings -> Player -> Other Settings 中勾选 GPU - Vertex Shader 开启此功能(具体界面见上图),并在 Shader 中添加 keyword ENABLE_VS_SKINNING,例如
CGPROGRAM
    ...
    #pragma vertex vert
    #pragma fragment frag
    #include "UnityCG.cginc"

    #pragma multi_compile _ ENABLE_VS_SKINNING
    ...
    struct appdata_t {
        float4 vertex : POSITION;
        float2 texcoord : TEXCOORD0;
        ...
    };

    struct v2f {
        float4 pos : SV_POSITION;
        float2 uv : TEXCOORD0;
        ...
    };

    v2f vert (appdata_t v)
    {
        v2f o;
        ...
        o.vertex = UnityObjectToClipPos(v.vertex);
        ...
    }
    ...
ENDCG
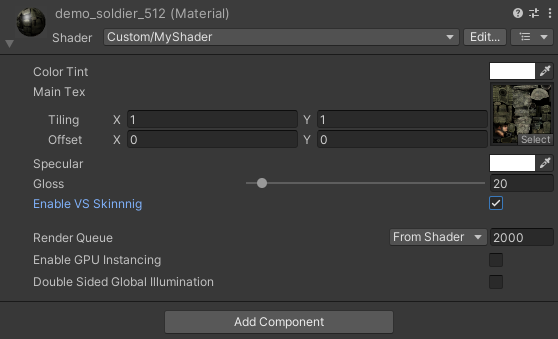
通过 multi_compile 添加 keyword 时,SkinnedMeshRenderer 会根据 Player Settings 自动启用 keyword。如果确定该 shader 只会使用 VS Skinning,且不希望生成禁用此 keyword 的变体,可以通过 shader_feature 添加 keyword。但此时需要添加 Material Inspector,并确保 keyword 处于启用状态,详情可参见 MaterialPropertyDrawer。示例:
Shader "Custom/MyShader"
{
    Properties
    {
        // Display a toggle in the Material's Inspector window
        [Toggle(ENABLE_VS_SKINNING)] EnableVSSkinning("Enable VS Skinnnig", Float) = 1.0
    }
    SubShader
    {
        Pass
        {
            Tags { "LightMode"="ForwardBase" }

            CGPROGRAM
            ...
            #pragma shader_feature ENABLE_VS_SKINNING
            ....
            ENDCG
        }
        ...
    }
}
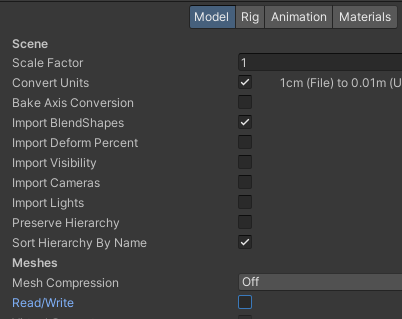
- 如果你的 SkinnedMeshRenderer 组件使用了 VS Skinning,并且它的 mesh 数据在其他地方没有被使用,你可以禁用 Read/Write,并确保 release mesh data 选项被勾选(默认被勾选),这样可以减少游戏运行时的内存占用。
- 如果同一个 mesh 在不同 renderer 中分别以 VS 和 CPU Skinning 方式被使用,那么 mesh 数据不会被释放,因为它们在不同的地方被需要。
- 当你在 PlayerSettings 中更改蒙皮计算的方式时(比如从 VS Skinning 切换到 CPU Skinning ),你不需要重新设置网格的 Read/Write 权限或 release mesh data 的选项,因为这些设置与蒙皮计算方式的切换是独立的。

实现原理
ShaderCompiler 识别到 keyword 后,会自动在 vertex shader 的函数入口注入 skinning 计算代码,新的顶点位置仍然在 Object Space,保存在输入的 POSITION 通道,例如 v.vertex,因此无需额外修改 shader 函数。
自动注入后的代码示例:
static const int max_bone_count = 64;
uniform int BonesPerVertex;
uniform float4 Bones [max_bone_count * 3];
bool GetLocalToWorldMatrix (in float4 boneWeights_in, in uint4 boneIndices_in, out float4x4 localToWorldMatrix)
{
    if (BonesPerVertex == 1)
    {
        localToWorldMatrix = float4x4 (Bones [int (boneIndices_in . x) * 3 + 0], Bones [int (boneIndices_in . x) * 3 + 1], Bones [int (boneIndices_in . x) * 3 + 2], float4 (0.0, 0.0, 0.0, 1.0));
    }
    else if (BonesPerVertex == 2)
    {
        localToWorldMatrix = float4x4 (Bones [int (boneIndices_in . x) * 3 + 0], Bones [int (boneIndices_in . x) * 3 + 1], Bones [int (boneIndices_in . x) * 3 + 2], float4 (0.0, 0.0, 0.0, 1.0)) * boneWeights_in . x;
        localToWorldMatrix += float4x4 (Bones [int (boneIndices_in . y) * 3 + 0], Bones [int (boneIndices_in . y) * 3 + 1], Bones [int (boneIndices_in . y) * 3 + 2], float4 (0.0, 0.0, 0.0, 1.0)) * boneWeights_in . y;
    }
    else if (BonesPerVertex == 4)
    {
        localToWorldMatrix = float4x4 (Bones [int (boneIndices_in . x) * 3 + 0], Bones [int (boneIndices_in . x) * 3 + 1], Bones [int (boneIndices_in . x) * 3 + 2], float4 (0.0, 0.0, 0.0, 1.0)) * boneWeights_in . x;
        localToWorldMatrix += float4x4 (Bones [int (boneIndices_in . y) * 3 + 0], Bones [int (boneIndices_in . y) * 3 + 1], Bones [int (boneIndices_in . y) * 3 + 2], float4 (0.0, 0.0, 0.0, 1.0)) * boneWeights_in . y;
        localToWorldMatrix += float4x4 (Bones [int (boneIndices_in . z) * 3 + 0], Bones [int (boneIndices_in . z) * 3 + 1], Bones [int (boneIndices_in . z) * 3 + 2], float4 (0.0, 0.0, 0.0, 1.0)) * boneWeights_in . z;
        localToWorldMatrix += float4x4 (Bones [int (boneIndices_in . w) * 3 + 0], Bones [int (boneIndices_in . w) * 3 + 1], Bones [int (boneIndices_in . w) * 3 + 2], float4 (0.0, 0.0, 0.0, 1.0)) * boneWeights_in . w;
    }
    else
    {
        localToWorldMatrix = float4x4 (float4 (1.0, 0.0, 0.0, 0.0),
        float4 (0.0, 1.0, 0.0, 0.0),
        float4 (0.0, 0.0, 1.0, 0.0),
        float4 (0.0, 0.0, 0.0, 1.0));
        return false;
    }
    return true;
}

void VertexShaderSkinning_float (in float3 vertex_in, in float4 boneWeights_in, in uint4 boneIndices_in, out float3 vertex_out)
{
    float4 inPos = float4 (vertex_in, 1.0);
    float4x4 localToWorldMatrix;
    if (GetLocalToWorldMatrix (boneWeights_in, boneIndices_in, localToWorldMatrix))
    {
        vertex_out = mul (localToWorldMatrix, inPos) . xyz;
    }
}

void vs_skinning (inout float3 vertex, in float4 boneWeights, in float4 boneIndices)
{
    VertexShaderSkinning_float (vertex, boneWeights, uint4 ((uint) boneIndices . x, (uint) boneIndices . y, (uint) boneIndices . z, (uint) boneIndices . w), vertex);
}

v2f vert (appdata_t v, float4 boneIndices : BLENDINDICES, float4 boneWeights : BLENDWEIGHTS)
{
    vs_skinning(v.vertex, boneWeights, boneIndices);

    v2f o;
    o = (v2f) 0;
    o.vertex = UnityObjectToClipPos (v.vertex);
    ...
}
已经支持的内置Shader
Built-in RP:
- Mobile/Bumped Diffuse
- Mobile/Bumped Specular (1 Directional Realtime Light)
- Mobile/Bumped Specular
- Mobile/Diffuse
- Mobile/VertexLit (Only Directional Lights)
- Unlit/Transparent
- Unlit/Transparent Cutout
- Unlit/Color
- Unlit/Texture
URP:
- Universal Render PipelineA series of operations that take the contents of a Scene, and displays them on a screen. Unity lets you choose from pre-built render pipelines, or write your own. More info
See in Glossary/Simple Lit - Universal Render Pipeline/Unlit
- Universal Render Pipeline/Lit
- Universal Render Pipeline/ComplexLit
- Universal Render Pipeline/BakedLit
注意
- 同一个 Renderer 使用多个 Material 时,例如有多个 SubMesh,所有 Materials 必须都添加
ENABLE_VS_SKINNINGKeyword才能开启 VS Skinning; - 当 PlayerSettings 中选择了 VS Skinning,对于没有添加 keyword 的 shaders,会 Fallback 到CPU Skinning;
- 暂不支持运行时切换 Material;
- 暂不支持运行时启用或禁用
ENABLE_VS_SKINNINGKeyword; - 暂不支持 BlendShape 和 MotionVector;
- 不支持使用 Legacy shaderlab command 的 Pass,如 Mobile/VertexLit 中的 Vertex LightMode;
- 如果遇到动画的顶点位置错误,可尝试 reimport mesh 和 shader资源。
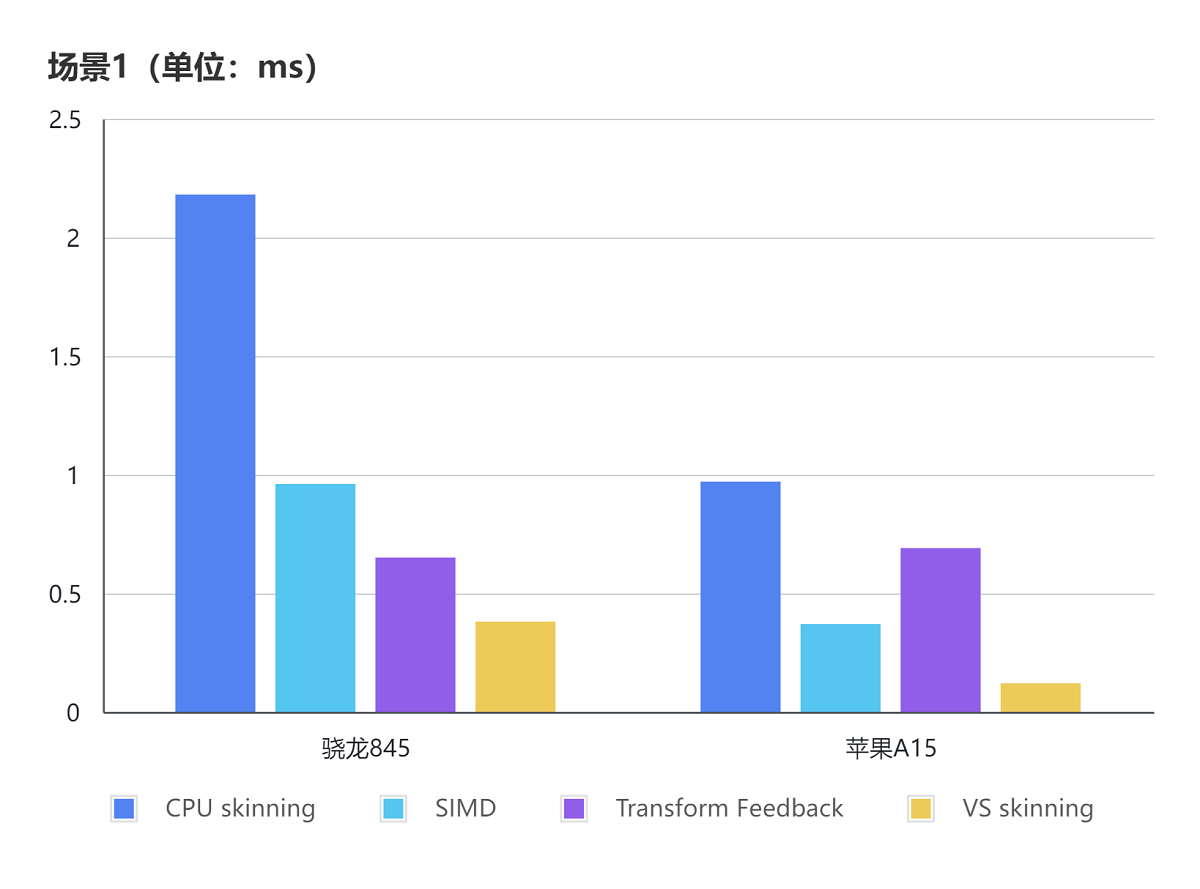
性能对比
场景1:21,488个面,15,172个顶点,212个骨骼,(接近一般MMO副本需求)
场景2:257,856个面,182,064个顶点,2544 个骨骼,(接近多同屏人数需求)
其他设置: Shader: URP Simple Lit;SRP batcher: on