Unity Manual
- Unity 6 Preview User Manual
- What's new in Unity
- Packages and feature sets
- Released packages
- 2D Animation
- 2D Aseprite Importer
- 2D Pixel Perfect
- 2D PSD Importer
- 2D SpriteShape
- 2D Tilemap Extras
- Adaptive Performance
- Addressables
- Addressables for Android
- Ads Mediation
- Advertisement Legacy
- AI Navigation
- Alembic
- Analytics
- Android Logcat
- Animation Rigging
- Apple ARKit XR Plugin
- AR Foundation
- Authentication
- Build Automation
- Burst
- CCD Management
- Cinemachine
- Cloud Code
- Cloud Diagnostics
- Cloud Save
- Code Coverage
- Collections
- Dedicated Server
- Deployment
- Device Simulator Devices
- Economy
- Editor Coroutines
- Entities
- Entities Graphics
- FBX Exporter
- Friends
- Google ARCore XR Plugin
- Havok Physics for Unity
- In App Purchasing
- Input System
- iOS 14 Advertising Support
- JetBrains Rider Editor
- Leaderboards
- Live Capture
- Lobby
- Localization
- Magic Leap XR Plugin
- Matchmaker
- Mathematics
- Memory Profiler
- Microsoft GDK API
- Microsoft GDK Tools
- ML Agents
- Mobile Notifications
- Multiplay
- Multiplayer Play Mode
- Multiplayer Tools
- Muse Sprite Tool
- Muse Texture Tool
- Netcode for Entities
- Netcode for GameObjects
- Oculus XR Plugin
- OpenXR Plugin
- Performance testing API
- Player Accounts
- Polybrush
- Post Processing
- ProBuilder
- Profile Analyzer
- Push Notifications
- Python Scripting
- Recorder
- Relay
- Remote Config
- Scriptable Build Pipeline
- Sequences
- Services Tooling
- SharpZipLib
- Splines
- Sysroot Base
- Sysroot Linux x64
- System Metrics Mali
- Terrain Tools
- Test Framework
- Timeline
- Toolchain Linux x64
- Toolchain MacOS Arm64 Linux x64
- Toolchain MacOS Linux x64
- Toolchain Win Linux x64
- Toolchain WinArm64 Linux x64
- Tutorial Authoring Tools
- Tutorial Framework
- Unity Logging
- Unity OpenXR Meta
- Unity Physics
- Unity Profiling Core API
- Unity Transport
- User Generated Content
- User Generated Content Bridge
- User Reporting
- Version Control
- Visual Scripting
- Visual Studio Editor
- Vivox
- WebGL Publisher
- XR Hands
- XR Interaction Toolkit
- XR Plugin Management
- ZivaRT Player
- Release candidates
- Pre-release packages
- Core packages
- Built-in packages
- Accessibility
- AI
- AMD
- Android JNI
- Animation
- Asset Bundle
- Audio
- Cloth
- Director
- Image Conversion
- IMGUI
- JSONSerialize
- NVIDIA
- Particle System
- Physics
- Physics 2D
- Screen Capture
- Terrain
- Terrain Physics
- Tilemap
- UI
- UIElements
- Umbra
- Unity Analytics
- Unity Web Request
- Unity Web Request Asset Bundle
- Unity Web Request Audio
- Unity Web Request Texture
- Unity Web Request WWW
- Vehicles
- Video
- VR
- Wind
- XR
- Experimental packages
- Packages by keywords
- Unity's Package Manager
- How Unity works with packages
- Concepts
- Configuration
- Package Manager window
- Access the Package Manager window
- Navigation panel
- List panel
- Details panel
- Features (details panel)
- Finding packages and feature sets
- Add and remove UPM packages or feature sets
- Install a feature set from the Unity registry
- Install a UPM package from a registry
- Install a UPM package from the Asset Store
- Install a UPM package from a local folder
- Install a UPM package from a local tarball file
- Install a UPM package from a Git URL
- Install a UPM package by name
- Remove a UPM package from a project
- Switch to another version of a UPM package
- Add and remove asset packages
- Disable a built-in package
- Perform an action on multiple packages
- Finding package documentation
- Inspecting packages
- Scripting API for packages
- Scoped registries
- Resolution and conflict
- Project manifest
- Troubleshooting
- Creating custom packages
- Feature sets
- Released packages
- Install Unity
- System requirements for Unity 6 Preview
- Install Unity from the command line
- Install Unity offline without the Hub
- Deploy Unity across your enterprise
- Enable Unity installation by standard users (Windows)
- Use Unity through web proxies
- Enable automatic proxy configuration
- Store credentials for automatic proxy configuration (Windows)
- Store credentials for automatic proxy configuration (macOS)
- Trusting the web proxy security certificate
- Use environment variables to identify your web proxy
- Create a command file to set environment variables and open applications
- Define exceptions on your web proxy
- Licenses and activation
- Upgrade Unity
- Create with Unity
- 2D or 3D projects
- Unity's interface
- The Project window
- The Scene view
- The Game view
- Device Simulator
- The Hierarchy window
- The Inspector window
- Editing properties
- The Toolbar
- The status bar
- The Background Tasks window
- Console Window
- Additional windows
- Undo
- Search in the Editor
- Customizing your workspace
- Unity shortcuts
- Quickstart guides
- Advanced best practice guides
- Create Gameplay
- Editor Features
- Analysis
- Memory in Unity
- Profiler overview
- Profiling your application
- Common Profiler markers
- The Profiler window
- Asset Loading Profiler module
- Audio Profiler module
- CPU Usage Profiler module
- File Access Profiler module
- Global Illumination Profiler module
- GPU Usage Profiler module
- Highlights Profiler Module
- Memory Profiler module
- Physics Profiler module
- Physics 2D Profiler module
- Rendering Profiler module
- UI and UI Details Profiler
- Video Profiler module
- Virtual Texturing Profiler module
- Customizing the Profiler
- Low-level native plug-in Profiler API
- Profiling tools
- Log files
- Understanding optimization in Unity
- Asset loading metrics
- Asset workflow
- Input
- 2D game development
- Introduction to 2D
- 2D game development quickstart guide
- 2D Sorting
- Work with sprites
- Tilemaps
- Essential tilemap steps and tools
- Active brush
- Create Tilemaps
- Create tile assets
- Create a Tile Palette
- Tile Palette editor tools
- Using the Select tool
- Move selected tiles with the Move tool
- Paint tiles with the Paint tool
- Use the Box Fill tool to fill an area with duplicated tiles
- Select tiles on the tilemap or Tile Palette with the Pick tool
- Remove tiles from the tilemap with the Eraser tool
- Fill an empty area with tiles with the Flood Fill tool
- Brush Picks
- Tilemap Collider 2D component reference
- Hexagonal Tilemaps
- Isometric Tilemaps
- Scriptable Tiles
- Scriptable Brushes
- Tile Palette visual elements
- Tilemap component reference
- Grid component reference
- Tilemap Renderer component reference
- Tile asset reference
- Tile Palette preferences reference
- Tile Palette editor reference
- Brush Inspector window reference
- Essential tilemap steps and tools
- Physics 2D Reference
- Graphics
- Render pipelines
- Render pipelines introduction
- Render pipeline feature comparison
- How to get, set, and configure the active render pipeline
- Choosing and configuring a render pipeline and lighting solution
- Using the Built-in Render Pipeline
- Using the Universal Render Pipeline
- Using the High Definition Render Pipeline
- Scriptable Render Pipeline fundamentals
- Creating a custom render pipeline
- Cameras
- Lighting
- Introduction to lighting
- Light sources
- Shadows
- The Lighting window
- Lighting Settings Asset
- The Light Explorer window
- Lightmapping
- Realtime Global Illumination using Enlighten
- Light Probes
- Reflection Probes
- Precomputed lighting data
- Debug Draw Modes for lighting
- Models
- Meshes
- Textures
- Importing Textures
- Texture Import Settings
- Default Import Settings reference
- Normal map Import Settings reference
- Editor GUI and Legacy GUI Import Settings reference
- Sprite (2D and UI) Import Settings reference
- Cursor Import Settings reference
- Cookie Import Settings reference
- Lightmap Import Settings reference
- Directional Lightmap Import Settings reference
- Shadowmask Import Settings reference
- Single Channel Import Settings reference
- Texture Import Settings
- Texture formats
- Mipmaps
- Render Texture
- Custom Render Textures
- Movie Textures
- 3D textures
- Texture arrays
- Cubemaps
- Cubemap arrays
- Streaming Virtual Texturing
- Streaming Virtual Texturing requirements and compatibility
- How Streaming Virtual Texturing works
- Enabling Streaming Virtual Texturing in your project
- Using Streaming Virtual Texturing in Shader Graph
- Cache Management for Virtual Texturing
- Marking textures as "Virtual Texturing Only"
- Virtual Texturing error material
- Sparse Textures
- Loading texture and mesh data
- Importing Textures
- Shaders
- Shaders core concepts
- Built-in shaders
- Standard Shader
- Standard Particle Shaders
- Autodesk Interactive shader
- Legacy Shaders
- Using Shader Graph
- Writing shaders
- Writing shaders overview
- ShaderLab
- ShaderLab: defining a Shader object
- ShaderLab: defining a SubShader
- ShaderLab: defining a Pass
- ShaderLab: adding shader programs
- ShaderLab: specifying package requirements
- ShaderLab: commands
- ShaderLab: grouping commands with the Category block
- ShaderLab command: AlphaToMask
- ShaderLab command: Blend
- ShaderLab command: BlendOp
- ShaderLab command: ColorMask
- ShaderLab command: Conservative
- ShaderLab command: Cull
- ShaderLab command: Offset
- ShaderLab command: Stencil
- ShaderLab command: UsePass
- ShaderLab command: GrabPass
- ShaderLab command: ZClip
- ShaderLab command: ZTest
- ShaderLab command: ZWrite
- ShaderLab legacy functionality
- HLSL in Unity
- Preprocessor directives in HLSL
- Shader semantics
- Accessing shader properties in Cg/HLSL
- Providing vertex data to vertex programs
- Built-in shader include files
- Built-in macros
- Built-in shader helper functions
- Built-in shader variables
- Shader data types and precision
- Using sampler states
- GLSL in Unity
- Example shaders
- Writing Surface Shaders
- Writing shaders for different graphics APIs
- Understanding shader performance
- Materials
- Visual effects
- Post-processing and full-screen effects
- Particle systems
- Choosing your particle system solution
- Built-in Particle System
- Using the Built-in Particle System
- Particle System vertex streams and Standard Shader support
- Particle System GPU Instancing
- Particle System C# Job System integration
- Components and Modules
- Particle System
- Particle System modules
- Main module
- Emission module
- Shape module
- Velocity over Lifetime module
- Noise module
- Limit Velocity over Lifetime module
- Inherit Velocity module
- Lifetime by Emitter Speed module
- Force over Lifetime module
- Color over Lifetime module
- Color by Speed module
- Size over Lifetime module
- Size by Speed module
- Rotation over Lifetime module
- Rotation by Speed module
- External Forces module
- Collision module
- Triggers module
- Sub Emitters module
- Texture Sheet Animation module
- Lights module
- Trails module
- Custom Data module
- Renderer module
- Particle System Force Field
- Visual Effect Graph
- Decals and projectors
- Lens flares and halos
- Lines, trails, and billboards
- Sky
- Color
- Graphics API support
- Graphics performance and profiling
- Render pipelines
- World building
- Physics
- Built-in 3D Physics
- Character control
- Rigidbody physics
- Collision
- Joints
- Articulations
- Ragdoll physics
- Cloth
- Multi-scene physics
- Physics Debug window reference
- Built-in 3D Physics
- Scripting
- Get started
- Unity scripting fundamentals
- Code reload in the Unity Editor
- Split tasks across frames or threads
- Scripting backends
- Script compilation
- Script serialization
- Plug-ins
- Unity Properties
- UnityWebRequest
- Multiplayer
- Audio
- Audio overview
- Audio files
- Tracker Modules
- Audio Mixer
- Native audio plug-in SDK
- Audio playlist randomization
- Audio Profiler
- Ambisonic Audio
- Audio Reference
- Audio Clip
- Audio Listener
- Audio Source
- Audio Mixer
- Audio Filters
- Audio Effects
- Audio Low Pass Effect
- Audio High Pass Effect
- Audio Echo Effect
- Audio Flange Effect
- Audio Distortion Effect
- Audio Normalize Effect
- Audio Parametric Equalizer Effect
- Audio Pitch Shifter Effect
- Audio Chorus Effect
- Audio Compressor Effect
- Audio SFX Reverb Effect
- Audio Low Pass Simple Effect
- Audio High Pass Simple Effect
- Reverb Zones
- Microphone
- Audio Settings
- Video overview
- Animation
- Animation system overview
- Rotation in animations
- Animation Clips
- Animator Controllers
- Retargeting of Humanoid animations
- Performance and optimization
- Animation Reference
- Animation FAQ
- Playables API
- A Glossary of animation terms
- Legacy Animation system
- User interface (UI)
- Comparison of UI systems in Unity
- UI Toolkit
- Get started with UI Toolkit
- UI Builder
- Structure UI
- The visual tree
- Structure UI with UXML
- Structure UI with C# scripts
- Custom controls
- Best practices for managing elements
- Encapsulate UXML documents with logic
- UXML elements reference
- UXML element BindableElement
- UXML element VisualElement
- UXML element BoundsField
- UXML element BoundsIntField
- UXML element Box
- UXML element Button
- UXML element ColorField
- UXML element CurveField
- UXML element DoubleField
- UXML element DropdownField
- UXML element EnumField
- UXML element EnumFlagsField
- UXML element FloatField
- UXML element Foldout
- UXML element GradientField
- UXML element GroupBox
- UXML element Hash128Field
- UXML element HelpBox
- UXML element IMGUIContainer
- UXML element Image
- UXML element InspectorElement
- UXML element IntegerField
- UXML element Label
- UXML element LayerField
- UXML element LayerMaskField
- UXML element LongField
- UXML element ListView
- UXML element MaskField
- UXML element MinMaxSlider
- UXML element MultiColumnListView
- UXML element MultiColumnTreeView
- UXML element ObjectField
- UXML element PopupWindow
- UXML element ProgressBar
- UXML element PropertyField
- UXML element RadioButton
- UXML element RadioButtonGroup
- UXML element RectField
- UXML element RectIntField
- UXML element RepeatButton
- UXML element RenderingLayerMaskField
- UXML element ScrollView
- UXML element Scroller
- UXML element Slider
- UXML element SliderInt
- UXML element Tab
- UXML element TabView
- UXML element TagField
- UXML element TextElement
- UXML element TextField
- UXML element TemplateContainer
- UXML element Toggle
- UXML element ToggleButtonGroup
- UXML element Toolbar
- UXML element ToolbarBreadcrumbs
- UXML element ToolbarButton
- UXML element ToolbarMenu
- UXML element ToolbarPopupSearchField
- UXML element ToolbarSearchField
- UXML element ToolbarSpacer
- UXML element ToolbarToggle
- UXML element TreeView
- UXML element TwoPaneSplitView
- UXML element UnsignedLongField
- UXML element UnsignedIntegerField
- UXML element Vector2Field
- UXML element Vector2IntField
- UXML element Vector3Field
- UXML element Vector3IntField
- UXML element Vector4Field
- Structure UI examples
- Create list and tree views
- Create a complex list view
- Create a list view runtime UI
- Wrap content inside a scroll view
- Create a tabbed menu
- Create a pop-up window
- Use Toggle to create a conditional UI
- Create a custom control with two attributes
- Create a slide toggle custom control
- Create a bindable custom control
- Create a custom style for a custom control
- Create a drag-and-drop list and tree views between windows
- Create an aspect ratio custom control
- Style UI
- UI Toolkit Debugger
- Control behavior with events
- UI Renderer
- Data binding
- Comparison of the binding systems
- Runtime data binding
- SerializedObject data binding
- Introduction to SerializedObject data binding
- Bindable elements reference
- Bindable data types and fields
- Binding system implementation details
- Binding examples
- Bind with binding path in C# script
- Bind without the binding path
- Bind with UXML and C# script
- Create a binding with the Inspector
- Bind to nested properties
- Bind to a UXML template
- Receive callbacks when a bound property changes
- Receive callbacks when any bound properties change
- Bind to a list with ListView
- Bind to a list without ListView
- Bind a custom control
- Bind a custom control to custom data type
- Support for Editor UI
- Support for runtime UI
- Work with text
- Examples
- Migration guides
- Unity UI
- Immediate Mode GUI (IMGUI)
- Unity Services
- Setting up your project for Unity services
- Unity Organizations
- Unity Ads
- Unity Analytics
- Unity Cloud Content Delivery
- Unity Build Automation (formerly Cloud Build)
- Unity IAP
- Setting up Unity IAP
- Cross Platform Guide
- Codeless IAP
- Defining products
- Subscription Product support
- Initialization
- Browsing Product Metadata
- Initiating Purchases
- Processing Purchases
- Handling purchase failures
- Restoring Transactions
- Purchase Receipts
- Receipt validation
- Store Extensions
- Cross-store installation issues with Android in-app purchase stores
- Store Guides
- Implementing a Store
- Unity Cloud Diagnostics
- Unity Integrations
- Multiplayer Services
- Unity Distribution Portal
- Unity Accelerator
- XR
- Unity's Asset Store
- Asset Store packages
- Publish to the Asset Store
- Creating your Publisher Account
- Creating a new package draft
- Deleting a package draft
- Uploading assets to your package
- Filling in the package details
- Submitting your package for approval
- Viewing the status of your Asset Store submissions
- Collecting revenue
- Providing support to your customers
- Adding tags to published packages
- Connecting your account to Google Analytics
- Promoting your Assets
- Refunding your customers
- Upgrading packages
- Deprecating your Assets
- Issuing vouchers
- Managing your publishing team
- Asset Store Publisher portal
- Verified Solutions
- Platform development
- Using Unity as a Library in other applications
- Deep linking
- Xcode frame debugger Unity integration
- Build path requirements for target platforms
- Android
- Introducing Android
- Getting started with Android
- Developing for Android
- Android mobile scripting
- Input for Android devices
- Android application size restrictions
- Graphics for Android
- Testing and debugging
- Optimization for Android
- Create and use plug-ins in Android
- Integrating Unity into Android applications
- Android application entry points
- Deep linking on Android
- Device features and permissions
- Handle Android crashes
- Quit a Unity Android application
- Building and delivering for Android
- Dedicated Server
- iOS
- Introducing iOS
- Getting started with iOS
- Developing for iOS
- iOS Scripting
- Input for iOS devices
- Unity's Device Simulator for iOS
- Unity Remote
- Managed stack traces on iOS
- Optimize performance for iOS
- Native plug-ins for iOS
- Integrating Unity into native iOS applications
- Deep linking on iOS
- iOS authorizations in Unity
- Prepare your application for in-app purchases
- Social API
- Troubleshooting on iOS devices
- Reporting crash bugs for iOS
- Building and delivering for iOS
- Linux
- macOS
- tvOS
- visionOS
- Web
- Web introduction
- Web development
- Web Player settings
- Interaction with browser scripting
- Code examples: Call JavaScript and C/C++/C# functions in Unity
- Set up your JavaScript plug-in
- Call JavaScript functions from Unity C# scripts
- Call Unity C# script functions from JavaScript
- Call C/C++/C# functions from Unity C# scripts
- Compile a static library as a Unity plug-in
- Create callbacks between Unity C#, JavaScript, and C/C++/C# code
- Replace deprecated browser interaction code
- Web native plug-ins for Emscripten
- Memory in Unity Web
- Cache behavior in Web
- Web graphics
- Audio in Web
- Video playback in Web
- Texture compression in Web
- Embedded resources in Web
- WebAssembly 2023
- Web performance considerations
- Debug and troubleshoot Web builds
- Build and distribute a Web application
- Web Build Settings
- Build your Web application
- Optimize your Web build
- Recommended Graphics settings to optimize your Web build
- Recommended Player settings to optimize your Web build
- Recommended Quality settings to optimize your Web build
- Use C# code to enable optimization settings
- Optimize Web platform for mobile
- Web templates
- Deploy a Web application
- Server configuration code samples
- Windows
- Universal Windows Platform
- Introduction to Universal Windows Platform
- Get started with Universal Windows Platform
- Develop for Universal Windows Platform
- Build and deliver for Universal Windows Platform
- Unity Search
- Glossary
- Graphics
- Models
- Importing models into Unity
- Importing a model with humanoid animations
Importing a model with humanoid animations
This page contains guidance on importing a model for use with Unity’s Animation System. For information on creating a model for use with the Animation System, see Creating models for animation.
The Animation System works with two types of models:
- A Humanoid model is a specific structure, containing at least 15 bones organized in a way that loosely conforms to an actual human skeleton. This page contains guidance on importing this type of model.
- A Generic model is everything else. This might be anything from a teakettle to a dragon. For information on importing this type of model, see Importing a model with non-humanoid (generic) animations.
For general importing guidance that is applicable to all types of models, see Importing a model.
Overview
When Unity imports Model files that contain Humanoid Rigs and Animation, it needs to reconcile the bone structure of the Model to its Animation. It does this by mapping each bone in the file to a Humanoid Avatar so that it can play the Animation properly. For this reason, it is important to carefully prepare your Model fileA file containing a 3D data, which may include definitions for meshes, bones, animation, materials and textures. More info
See in Glossary before importing into Unity.
- Define the Rig type and create the Avatar.
- Correct or verify the Avatar’s mapping.
- Once you are finished with the bone mapping, you can optionally click the Muscles & Settings tab to tweak the Avatar’s muscle configuration.
- You can optionally save the mapping of your skeleton’s bones to the Avatar as a Human TemplateA pre-defined bone-mapping. Used for matching bones from FBX files to the Avatar. More info
See in Glossary (.ht) file. - You can optionally limit the animation that gets imported on certain bones by defining an Avatar Mask.
- From the Animation tab, enable the Import Animation option and then set the other Asset-specific properties, .
- If the file consists of multiple animations or actions, you can define specific action ranges as Animation Clips.
- For each Animation ClipAnimation data that can be used for animated characters or simple animations. It is a simple “unit” piece of motion, such as (one specific instance of) “Idle”, “Walk” or “Run”. More info
See in Glossary defined in the file, you can:- Change the pose and root transform
- Optimize looping
- Mirror the animation on both sides of the Humanoid skeleton.
- Add curves to the clip in order to animate the timings of other items
- Add events to the clip in order to trigger certain actions in time with the animation
- Discard part of the animation similar to using a runtime Avatar Mask but applied at import time
- Select a different Root Motion Node to drive the action from
- Read any messages from Unity about importing the clip
- Watch a preview of the animation clip
- To save your changes, click the Apply button at the bottom of the Import Settings window or Revert to discard your changes.
Set up the Avatar
From the Rig tab of the Inspector window, set the Animation Type to Humanoid. By default, the Avatar Definition property is set to Create From This Model. If you keep this option, Unity attempts to map the set of bones defined in the file to a Humanoid Avatar.
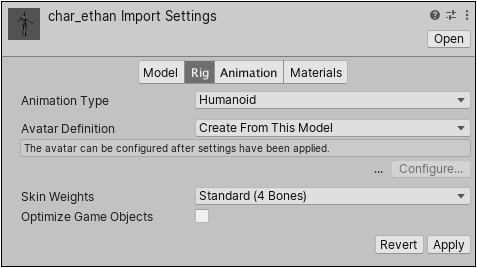
In some cases, you can change this option to Copy From Other Avatar to use an Avatar you already defined for another Model file. For example, if you create a MeshThe main graphics primitive of Unity. Meshes make up a large part of your 3D worlds. Unity supports triangulated or Quadrangulated polygon meshes. Nurbs, Nurms, Subdiv surfaces must be converted to polygons. More info
See in Glossary (skin) in your 3D modeling application with several distinct animations, you can export the Mesh to one FBX file, and each animation to its own FBX file. When you import these files into Unity, you only need to create a single Avatar for the first file you import (usually the Mesh). As long as all the files use the same bone structure, you can re-use that Avatar for the rest of the files (for example, all the animations).
If you enable this option, you must specify which Avatar you want to use by setting the Source property.
You can also change the maximum number of bones that can influence a given vertex with the Skin Weights property. By default, this property limits influence to four bones, but you can specify a different value.
When you click the Apply button, Unity tries to match up the existing bone structure to the Avatar bone structure. In many cases, it can do this automatically by analyzing the connections between bones in the rig.
If the match succeeds, a check mark appears next to the Configure menu. Unity also adds an Avatar sub-Asset to the Model Asset, which you can find in the Project view.
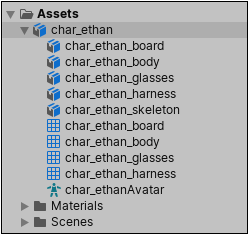
A successful match simply means that Unity was able to match all of the required bones. However, for better results, you also need to match the optional bones and set the model in a proper T-poseThe pose in which the character has their arms straight out to the sides, forming a “T”. The required pose for the character to be in, in order to make an Avatar.
See in Glossary.
If Unity can’t create the Avatar, a cross appears next to the Configure button, and no Avatar sub-asset appears in the Project view.
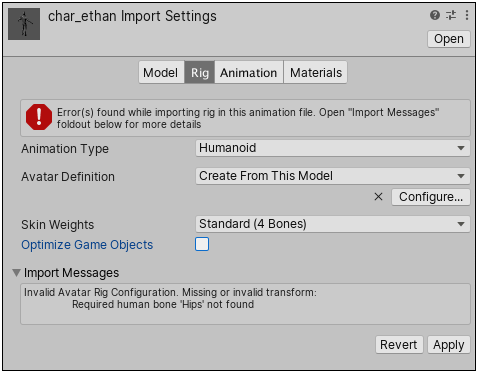
Since the Avatar is such an important aspect of the animation system, it is important to configure it properly for your ModelA 3D model representation of an object, such as a character, a building, or a piece of furniture. More info
See in Glossary.
For this reason, whether or not the automatic Avatar creation succeeds, you should always check that your Avatar is valid and properly set up.
Configure the Avatar
If you want to check that Unity correctly mapped your model’s bones to the Avatar, or if Unity failed to create the Avatar for your model, you can click the Configure … button on the RigA skeletal hierarchy of joints for a mesh. More info
See in Glossary tab to enter the Avatar configuration mode.
If Unity successfully creates an Avatar, the Avatar appears as a sub-asset of the model Asset. You can select the Avatar asset in the Project windowA window that shows the contents of your Assets folder (Project tab) More info
See in Glossary, and then click the “Configure Avatar” button in the Inspector to enter the Avatar configuration mode. This mode allows to check or adjust how Unity maps your model’s bones to the Avatar layout.

Once you have entered the Avatar configuration mode, the Avatar window appears in the InspectorA Unity window that displays information about the currently selected GameObject, asset or project settings, allowing you to inspect and edit the values. More info
See in Glossary displaying bone mapping.
Make sure the bone mapping is correct and that you map any optional bones that Unity did not assign.
Your skeleton needs to have at least the required bones in place for Unity to produce a valid match. In order to improve your chances for finding a match to the Avatar, name your bones in a way that reflects the body parts they represent. For example, “LeftArm” and “RightForearm” make it clear what these bones control.
Mapping strategies
If the model does not yield a valid match, you can use a similar process to the one that Unity uses internally:
- Choose Clear from the Mapping menu at the bottom of the Avatar window to reset any mapping that Unity attempted.
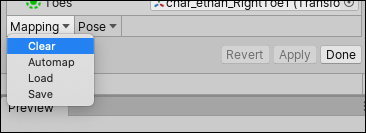
- Choose Sample Bind-pose from the Pose menu at the bottom of the Avatar window to approximate the Model’s initial modeling pose.
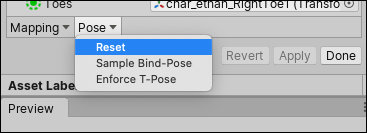
- Choose Mapping > Automap to create a bone-mapping from an initial pose.
- Choose Pose > Enforce T-Pose to set the Model back to to required T-pose.
If automapping fails completely or partially, you can manually assign bones by either dragging them from the SceneA Scene contains the environments and menus of your game. Think of each unique Scene file as a unique level. In each Scene, you place your environments, obstacles, and decorations, essentially designing and building your game in pieces. More info
See in Glossary view or from the Hierarchy view. If Unity thinks a bone fits, it appears in green in the Avatar Mapping tab; otherwise it appears in red.
Resetting the pose
The T-pose is the default pose required by Unity animation and is the recommended pose to model in your 3D modeling application. However, if you did not use the T-pose to model your character and the animation does not work as expected, you can select Reset from the Pose drop-down menu:

If the bone assignment is correct, but the character is not in the correct pose, you will see the message “Character not in T-Pose”. You can try to fix that by choosing Enforce T-Pose from the Pose menu. If the pose is still not correct, you can manually rotate the remaining bones into a T-pose.
Creating an Avatar Mask
Masking allows you to discard some of the animation data within a clip, allowing the clip to animate only parts of the object or character rather than the entire thing. For example, you may have a standard walking animation that includes both arm and leg motion, but if a character is carrying a large object with both hands then you wouldn’t want their arms to swing to the side as they walk. However, you could still use the standard walking animation while carrying the object by using a mask to only play the upper body portion of the carrying animation over the top of the walking animation.
You can apply masking to animation clips either during import time, or at runtime. Masking during import time is preferable, because it allows the discarded animation data to be omitted from your build, making the files smaller and therefore using less memory. It also makes for faster processing because there is less animation data to be blended at runtime. In some cases, import masking may not be suitable for your purposes. In that case, you can apply a mask at runtime by creating an Avatar MaskA specification for which body parts to include or exclude for an animation rig. Used in Animation Layers and in the importer. More info
See in Glossary Asset, and using it in the layer settings of your Animator ControllerControls animation through Animation Layers with Animation State Machines and Animation Blend Trees, controlled by Animation Parameters. The same Animator Controller can be referenced by multiple models with Animator components. More info
See in Glossary.
To create an empty Avatar Mask Asset, you can either:
- Choose Create > Avatar Mask from the AssetsAny media or data that can be used in your game or project. An asset may come from a file created outside of Unity, such as a 3D Model, an audio file or an image. You can also create some asset types in Unity, such as an Animator Controller, an Audio Mixer or a Render Texture. More info
See in Glossary menu. - Click the Model object you want to define the mask on in the ProjectIn Unity, you use a project to design and develop a game. A project stores all of the files that are related to a game, such as the asset and Scene files. More info
See in Glossary view, and then right-click and choose Create > Avatar Mask.
The new Asset appears in the Project view:
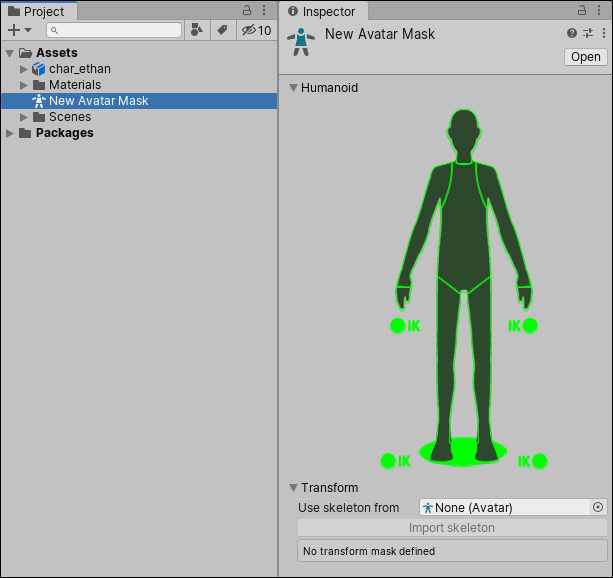
You can now add portions of the body to the mask and then add the mask to either an Animation LayerAn Animation Layer contains an Animation State Machine that controls animations of a model or part of it. An example of this is if you have a full-body layer for walking or jumping and a higher layer for upper-body motions such as throwing an object or shooting. The higher layers take precedence for the body parts they control. More info
See in Glossary or add a reference to it under the MaskCan refer to a Sprite Mask, a UI Mask, or a Layer Mask More info
See in Glossary section of the Animation tab.