- Unity 用户手册 2020.3 (LTS)
- Unity 服务
- Unity Cloud Build
- Setting up Cloud Build
- Using the Unity Developer Dashboard to configure Cloud Build for Git
Using the Unity Developer Dashboard to configure Cloud Build for Git
Cloud Build supports projects stored in Git repositories. Your repository can be hosted on GitHub, GitLab, Bitbucket, or private servers.
本主题介绍:
在控制面板上配置 Git
要配置 Cloud Build 以从 GitHub 代码仓库构建项目,请执行以下操作:
1.登录 Unity 开发者控制面板 (Developer Dashboard)。 2.在 Projects 页面上,选择您的项目。 3. Click DevOps > Cloud Build > Build History. 4.在 Build History 窗口中,单击 Set up Cloud Build。
您可以使用以下授权协议来配置对代码仓库的访问:
- OAuth(默认值)
- SSH
要配置 Cloud Build 以使用 OAuth 访问您的代码仓库,请执行以下操作:
1.在 Source Control 窗口中,单击 GitHub、Bitbucket 或 GitLab 磁贴。 2.根据所选源代码控制服务,授权访问您的帐户。 3.在 Select a Repository 窗口中,选择要从中构建项目的代码仓库,然后单击 NEXT: TARGET SETUP 按钮。
Note: Cloud Build uses your current credentials to retrieve the repository list if you are currently signed into the source code management service. To configure a Project that retrieves a repository from a different account, sign out of the source code management service first, then configure the Project.
For the next step, see Setting up a target build platform.
要配置 Cloud Build 以使用 SSH 访问您的代码仓库,请执行以下操作:
1.在 Source Control 窗口中,单击 Manual 选项卡。 2.在 SCM URL 字段中,按以下格式之一输入 Git 服务器的 URL:
* 非 SSL:host:port
* SSL:ssl:host:port
- To connect to your repository, you must specify the URL to your Git server. For information on the format of the URL, see URL syntax. Note: If you are hosting Git on a private server, you must use SSH to connect to your repository. 4.从 SCM Type 下拉菜单中,选择 GIT。 5.单击 NEXT: ACCESS 按钮。
When Cloud Build connects to the hosting site, it automatically detects whether your repository is public or private. If your repository is public, Cloud Build automatically connects to it, and you can skip to Setting up a target build platform. If your repository is private, see the Using private repositories section.
URL 语法
To connect to your repository, you must specify the URL to your Git server. You can specify the URL to use the https:// protocol.
Note: Git has depricated the git:// URL. If you are connecting via SSH, there are new security steps. See Improving Git protocol security on GitHub for more information.
以下是 GitHub、bitbucket 和 GitLab 的 URL 示例:
- https://github.com/youraccount/yourrepo
- git@bitbucket.org:youraccount/yourrepo.git
- git@gitlab.com:youracccount/yourrepo.git
注意:如果在私有服务器上托管 Git,必须使用 SSH 连接到代码仓库。
Unity Cloud Build automatically re-writes the URL into the format it needs.
使用私有代码仓库
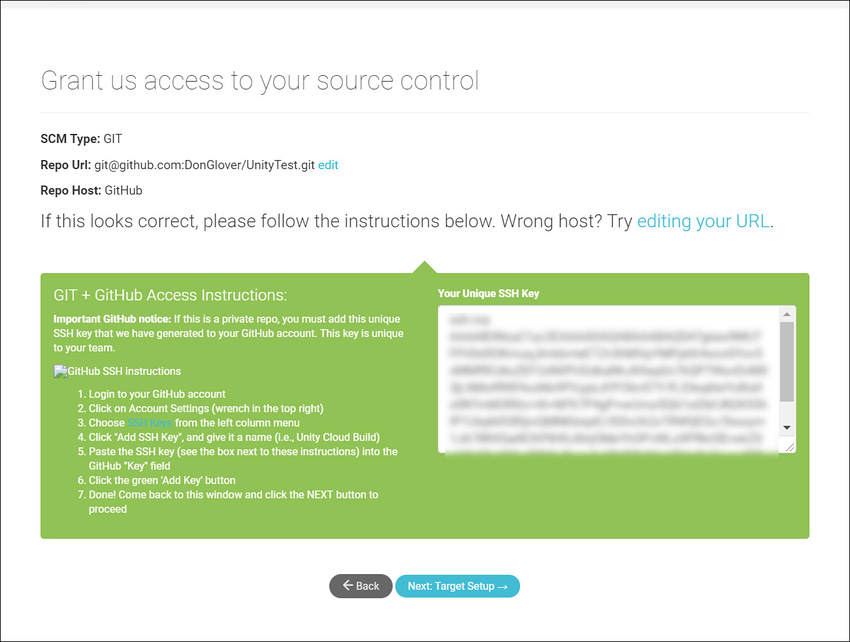
如果代码仓库为私有仓库,则 Cloud Build 必须使用 SSH 来连接它。Cloud Build 检测到代码仓库为私有仓库时,会显示 Grant us access to your source control 屏幕。

在 GitHub 上设置 SSH 密钥
要在 GitHub 中将 SSH 密钥添加到项目中,请执行以下操作:
1.登录 GitHub。
2.在任何 GitHub 页面的右上角,单击您的个人资料照片,然后单击您的个人资料。
3.在您的个人资料页面上,单击 __Repositories__,然后单击代码仓库的名称。
4.在代码仓库中,单击 Settings 选项卡。
5.在边栏中,单击 Deploy Keys__,然后单击 Add deploy key__ 按钮。
6.在 Title 文本框中,键入用于识别此密钥的名称。
7.在 Key 字段中,粘贴来自 Grant us access to your source control 窗口的公钥,然后单击 Add key 按钮。
有关部署密钥的更多信息,请参阅 GitHub 文档中的管理部署密钥 (Managing Deploy Keys)。
您还可以将 SSH 密钥添加到您的 GitHub 帐户,以便 Cloud Build 可访问帐户中的所有代码仓库。有关更多信息,请参阅 GitHub 文档中的将新的 SSH 密钥添加到您的 GitHub 帐户 (Adding a new SSH key to your GitHub account)。
在 Bitbucket 上设置 SSH 密钥
要将 SSH 密钥添加到 Bitbucket 帐户:
1.登录 Bitbucket。
2.在页面左下角单击您的头像。
- Click Bitbucket settings.
4.在 Settings 页面上的 SECURITY 部分中,单击 SSH Keys。
5.在 SSH Keys 中,单击 Add key 按钮。
6.在 Label 字段中,为密钥输入一个便于识别的名称(例如 __Unity Cloud Build__)。
7.将来自 Grant us access to your source control 窗口的 Unity Cloud Build SSH 密钥粘贴到 Key 字段中。
8.单击 Add Key。
在 Grant us access to your source control 窗口上,单击 Next: Target Setup。
设置目标编译平台
在控制面板中的 NEW BUILD TARGET: BASIC INFO 窗口上:
1.在 Target Label 字段中,输入编译名称。
2.如果代码仓库的根文件夹未包含您的资源和项目设置,请在 Project Subfolder 字段中输入包含所需资源和项目设置的文件夹的 URL。
3.从 Unity Version 下拉菜单中,选择用于编译项目的 Unity 版本。
4.如果不希望每次更新代码仓库时便自动编译项目,请单击 Auto-build 切换开关以禁用此功能。
如果要针对 iOS 或 Android 平台进行编译,则下一步是输入编译的凭据。单击 Next: Credentials。对于所有其他平台,请单击 Next: Build 以完成配置并开始初始编译。
Android 凭据
In the SIGNING CREDS window, provide the following information:
__Bundle ID__,用于在设备上和 Google Play 应用商店中唯一标识您的应用程序。
输入您的 Android 密钥库凭据或选择 Auto Generated Debug Keystore 来使用开发密钥库。有关 Android 密钥库的更多信息,请参阅 Android 密钥库系统 (Android Keystore System)。
iOS 凭据
In the iOS SIGNING CREDS window provide the following information:
__Bundle ID__,用于在设备上唯一标识您的应用程序。
用于编译应用程序的 Xcode 版本。
输入您的 IOS 凭据。有关 iOS 凭据的更多信息,请参阅发布到 iOS。
使用 Git 子模块
If your project uses private Git submodules, make sure that the URLs present in your .gitmodules file uses the git@ syntax instead of https://.
例如:
git@github.com:youraccount/yourrepo.git(对于 GitHub)
git@bitbucket.org:youraccount/yourrepo.git(对于 Bitbucket)
git@gitlab.com:youracccount/yourrepo.git(对于 GitLab)
2018–07–16页面已修订